We’re often asked how you can do this and that when editing our free CV templates so we’ve created a ‘how to’ article to help you through some common tasks. All of the instructions relate to Microsoft Word 2010. If there’s something we’ve not covered here, please do leave a comment below and we’ll update this guide.
NB: To download any of our CV templates in Microsoft Word format, go to the individual CV template page and where it says “Price: Free Download”, click the ‘Free Download’ part.
- How to install a new font
- How to create a circular photo for your CV
- How to change the picture on your CV
- How to change the background on your CV
- How to work with tables (enable text boundaries)
- How to use drop caps
- How to insert a fancy text box
- How to enable gridlines (for easy image placement)
- How to change the letter spacing
- How to adjust space between text
- How to edit the page border
- How to add background colour to text
- How to add an additional page to your CV
- How to line up templates that use objects
- How to save and print your CV (for best quality)
1. How to install a new font for your CV
Lots of our CV templates use lovely fonts that you might not already have on your computer. We’ll usually give you the links, if not the font files themselves.
(a) If we give you the font file
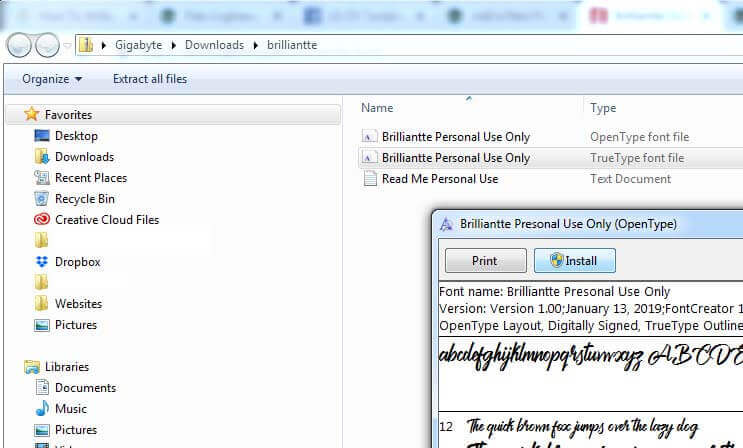
If we give you the font itself (usually a TrueType font file), simply download the file, click on it and click install.
(b) If we send you to a website (other than Google fonts)
If you have to visit a website to get the font, find the download button (take care as often these are mixed in with adverts). For example:

When you click download it will either download a TTF file for you, or a Zip. If it’s a zip, open it up and locate the TrueType font file. Double click on this and choose INSTALL. Once installed, you’ll find the font is available to use in Word and any other relevant applications.
Your new font should also automatically apply to your CV template, provided that you didn’t open it first before installing the font. If you did this, just compare your template to the preview photo, highlight any text where the font hasn’t applied and select the font in the font menu under the HOME tab in Word.
(c) If we send you to Google fonts
Quite a few of our CV templates use GOOGLE FONTS such as Open Sans. To install these, visit the page we’ve linked to and click ‘Select this font’ (top right):
![]()
![]()
A black dialogue box will appear bottom left. Click on the black bar to open it up, then click on the red arrow to the right:
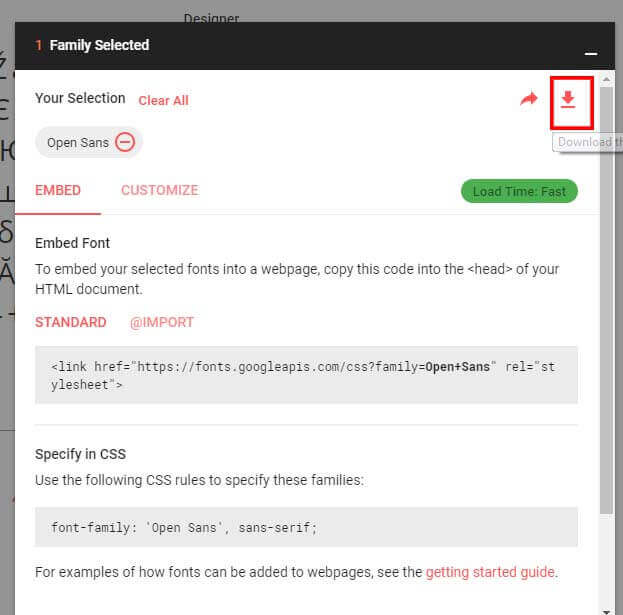
This will download a ZIP folder containing all the different font variations. You don’t have to install all of them – see which are needed for the CV. We use Open Sans a lot and we recommend you grab Open Sans Regular, Light, Semi Bold and Extra Bold as these are the four styles from the Open Sans family that are used in our CV templates.
2. How to create a circular photo for your CV
How do you get those nice round pictures that we always use in our templates?
- First, save your headshot as a square pic, somewhere you can find it (like the Desktop!)
- Under the INSERT tab, click SHAPES and choose OVAL.
- Draw a circle, holding down SHIFT as you do (to make sure it’s even).
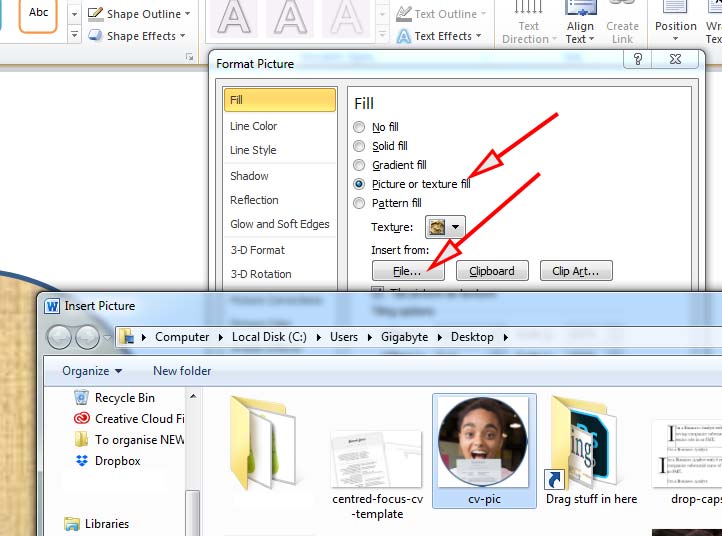
- Click on the circle and you’ll see the ‘Drawing Tools’ tab appear at the top. Click the tiny arrow to open up the ‘Format Picture’ dialogue.
- In that dialogue under FILL, click PICTURE OR TEXTURE FILL and then click the FILE button underneath.
- Choose your CV pic and click INSERT. Your pic will now appear in the circle.
You can add a border to the circle by clicking on it again to bring up the Drawing Tools menu. The option you need is SHAPE OUTLINE – from there you can choose the colour and weight, and you can even decide between a solid border and dots/dashes:

3. How to change the picture on your CV
If there’s already a photo on your CV (for example, because you’re using one of our fantastic CV templates), simply right click on the photo and choose ‘CHANGE PICTURE‘. A box will pop up allowing you to locate the photo of your choice on your CV.
4. How to change the background on your CV
Some of our CV templates have a background picture included – and you might decide you want to change this. First, be sure it’s actually a background picture (if you can click on it and select it, it’s a shape and you can move or resize it, or hit ENTER to delete).
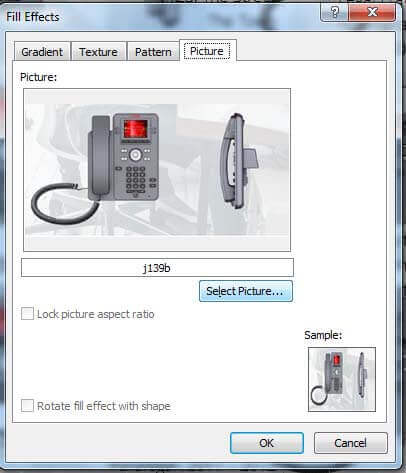
In Word 2010, you change the picture in the PAGE LAYOUT tab. Under that tab choose PAGE COLOR > FILL EFFECTS like so:
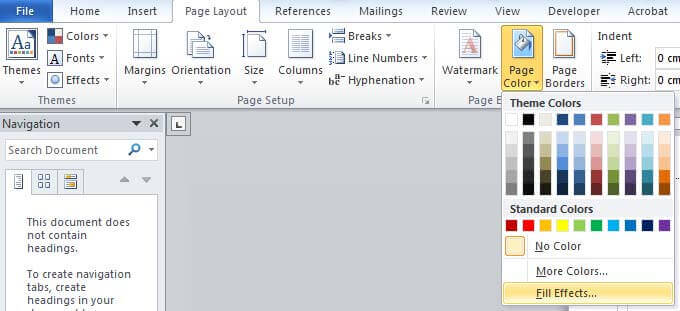
A dialogue box will pop up with four tabs – choose the PICTURE tab. Click SELECT PICTURE to choose a new picture. Alternatively, if you want a blank background, simply choose a plain white square < IF YOU RIGHT CLICK ON THIS LINK AND CHOOSE ‘SAVE LINK AS’, IT WILL SAVE A WHITE SQUARE FOR YOU WHICH YOU CAN SET AS THE BACKGROUND.
5. How to work with tables (enable text boundaries)
This is a super useful feature of Word which allows you to see the boundaries of tables, without having to add in borders. In Word 2010 it’s in FILE > OPTIONS > ADVANCED under “Show document content”.
Our CV templates will either be created using text boxes (which have a fixed position) or tables. We tend to create them using tables as people find them easier to manipulate, especially if they want to add more content or an additional page. However, only bits of the tables will have borders, depending on the design – so you can’t always see where they are. Sometimes none will have borders.
If you enable “show text boundaries” you’ll be able to see where all of those hidden tables are, but those boundaries don’t show when you print the file or save it as a PDF. They make working with the CV templates a lot simpler.
6. How to use drop caps
Drop caps are an easy way to make your CV look super swanky! They look really good with fonts like Times New Roman and Garamond. In Word 2010 you’ll find them under the INSERT tab, in the TEXT section. Simply highlight the drop cap and click the button.
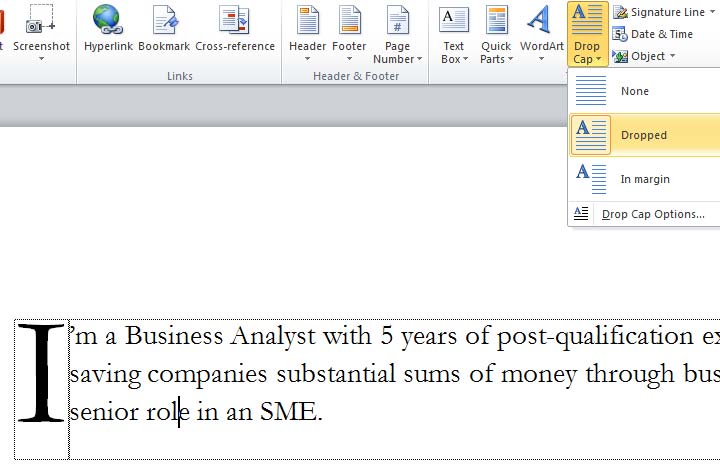
Note that there are twp options – Dropped or In Margin. You can see how the difference works with other text here: Your choice really depends on what other text is going on the page.
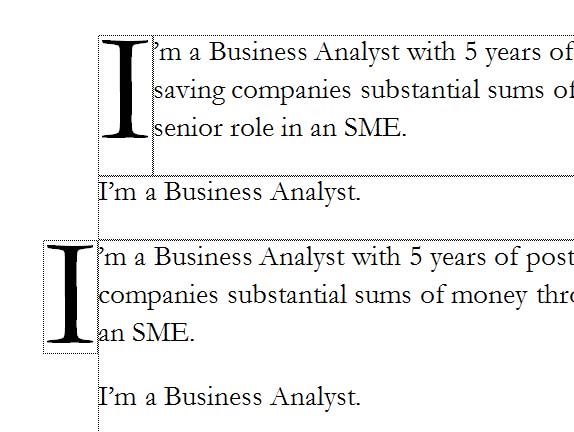
Unfortunately the Drop Caps feature doesn’t play nicely with Text Boxes or Tables so you have to break text out from those to be able to use the feature.
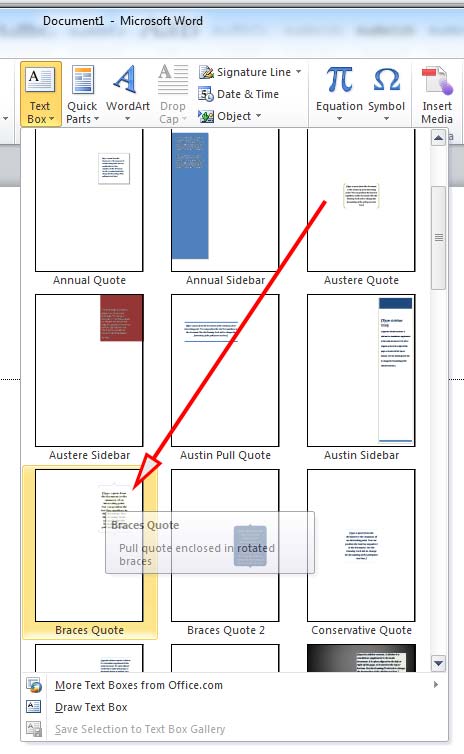
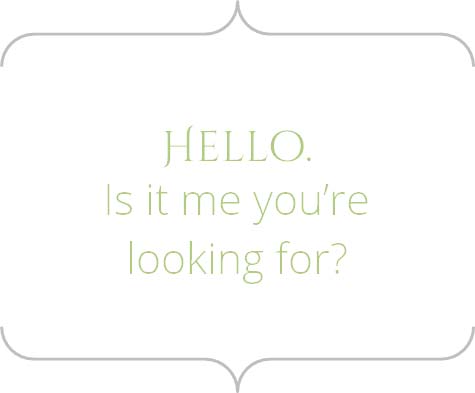
7. How to insert a fancy text box
MS Word 2010 comes with a range of text boxes and our favourite is the Braces Quote. This is a super way to insert a quote from one of your references into your CV template, or to add in a key achievement. You’ll find this feature under INSERT > TEXT > TEXT BOX:
Once you’ve inserted your quote, you might want to customise how it looks. You can drag it to the position you want it on the page and then double click to bring up the drawing tools menu. To change the colour of the brackets, select SHAPE OUTLINE and choose a different colour. To change the colour of the text, simply highlight the text, click on the home menu and choose your font style and colour as normal. Don’t feel confined to choosing the same font face, colour or size as the rest of your template!
8. How to enable gridlines (for easy image/shape placement)
Did you even know that Word had gridlines, a bit like a drawing programme? In Word 2010, these are under the VIEW tab, in the SHOW Section (Ruler, Gridlines and Navigation Pane are there). This outputs a grid onto your page which won’t show up when you’re printing or saving the file. The gridlines make it much easier to drag around shapes and text boxes with confidence, so you know everything is lined up.
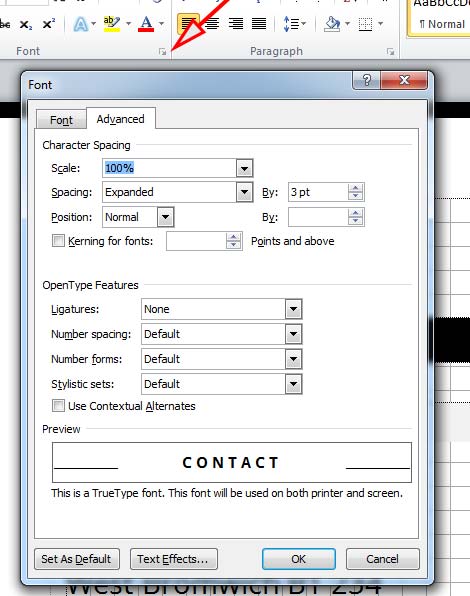
9. How to change the letter spacing
You can add spacing to letters to make a fancier title. For example:
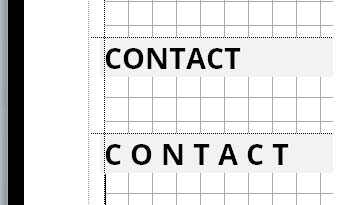
To do this, under the Home tab in Word, click the tiny arrow underneath Font to bring up the Font menu. Then click the ADVANCED tab and choose SPACING > EXPANDED. Add a value in the “By” box (e.g. 3pt).
10. How to adjust space between text
If you’re struggling with spacing your CV template beautifully, it’s good to know you can make fine adjustments without having to rely on your eyes! The menu you need can be found under the HOME or PAGE LAYOUT tabs, and it is called ‘Paragraph‘. Highlight the text you want to adjust, then click on the tiny arrow to the bottom right of the menu to open up the dialogue box.
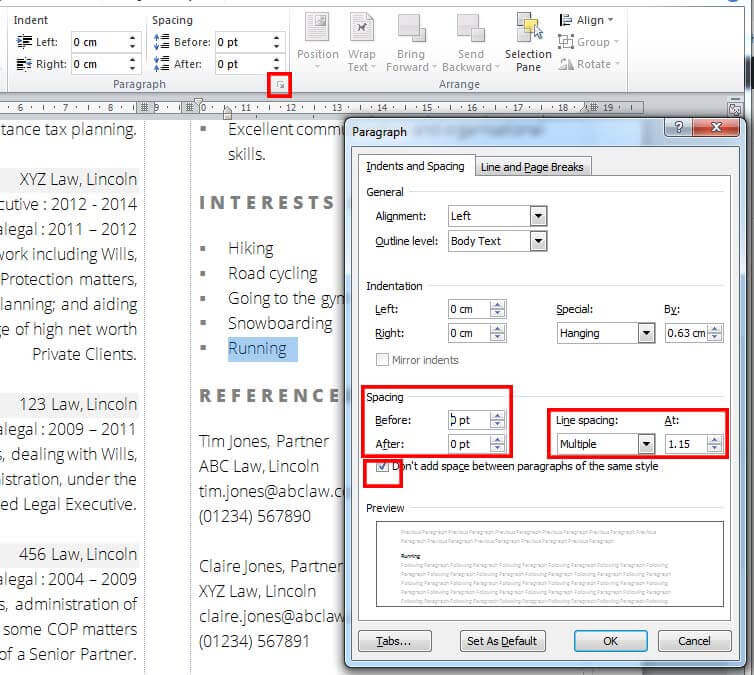
Here, you’ll see a number of settings and we’ve highlighted the ones you’ll be most interested in. You can choose to add space before or after a line of text (Spacing Before / After) or, if you’ve highlighted a block of text, you may wish to adjust the line spacing (in many of our templates, we set this to MULTIPLE at 1.15). When you’re working with a block of text you will get different spacing effects if you check or uncheck the ‘Don’t add space between paragraphs of the same style’ box – so you’ll need to experiment to get the spacing you’re looking for.
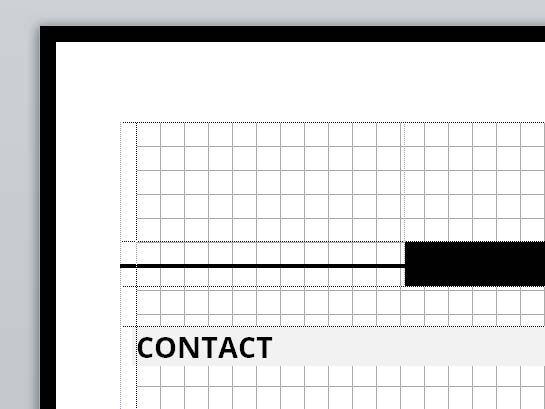
11. How to edit the page border
You’ll notice lots of our CVs have page borders and these are really easy to adjust. You’ll find the page border button under PAGE LAYOUT in the PAGE BACKGROUND section.
Here’s an example of the settings for a thick black page border all the way around the page:
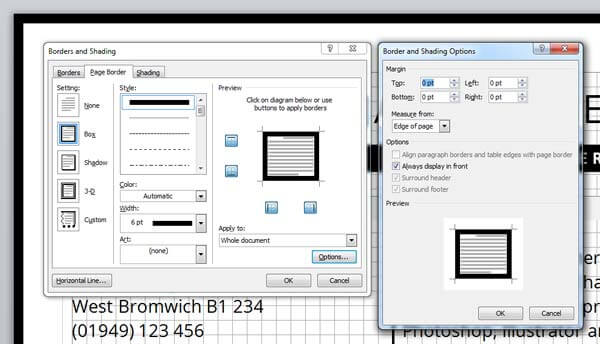
The second window is really important – this appears when you click OPTIONS underneath “apply to: whole document”. If you don’t adjust this window, your border will appear a little way in to the page. This is probably better for home printing, but won’t look as smart as an edge-to-edge border. The key is on the Border and Shading Options window (above right) to reduce the Margin to 0pt and make sure under “Measure From” it says “Edge of Page”.
12. How to add background colour to text
To give the text a coloured or shaded background like in the photo above, highlight the text and click on the paint bucket under Paragraph in the Home tab:
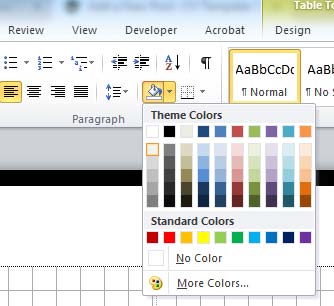
You can then select your choice of text background. The font spacing and text background colour are a really easy way to make attractive headings for your CV.
13. How to add an additional page to your CV
This is probably one of the most common queries we get. If you’re working with a CV that was created using tables, you don’t need to do anything special to add a further page. Keep adding in your content and the CV will simply spill onto the next page.
If however you’re working with one of the templates that lays everything out in boxes (and we have just a few of those), there’s no easy way to create a second page in the same document. The best thing to do here is to simply go to FILE > ‘Save as’ and save another copy of the template, then edit this as your second page.
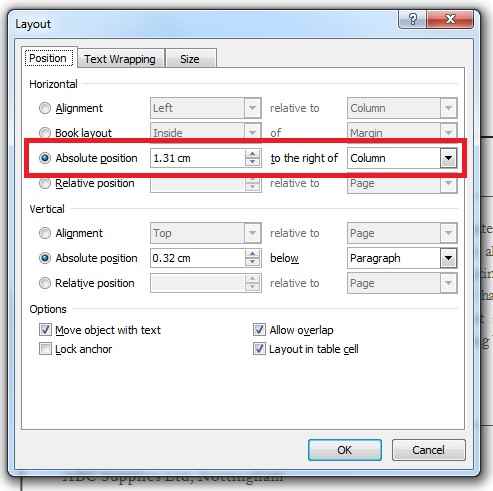
14. How to line up templates that use objects
A small number of our templates do not use tables – instead they use objects that are placed on the page. We recommend you enable the grid to help you line these up (see above). However, there’s a more accurate way of getting perfect spacing.
You’ll see that all the elements can be dragged around and you might find yourself shifting headings up and down to fit your information – so how do you make sure they are perfectly aligned afterwards?
If the element is an ICON:
- Right click on the icon
- Choose ‘SIZE AND POSITION’
- Select the ‘POSITION’ tab.
From here you can ensure the Horizontal ‘Absolute Position’ matches all the other icons.
For example, on our Achiever CV template, this is the setting for lining up the Contact and Social Media icons:
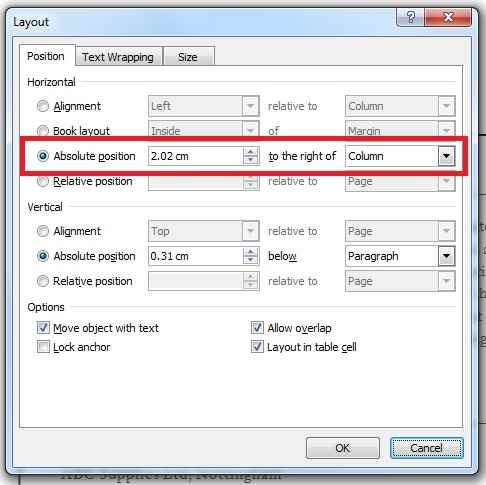
There’s a slightly different way to do the same thing for the other elements in the template (horizontal lines and text):
- Hover over the edge of the element until the cross hair appears.
- Right click and choose “More Layout Options”.
- Navigate to the position tab.
Again, on our Achiever CV template this is the setting for lining up the Contact and Social Media text:
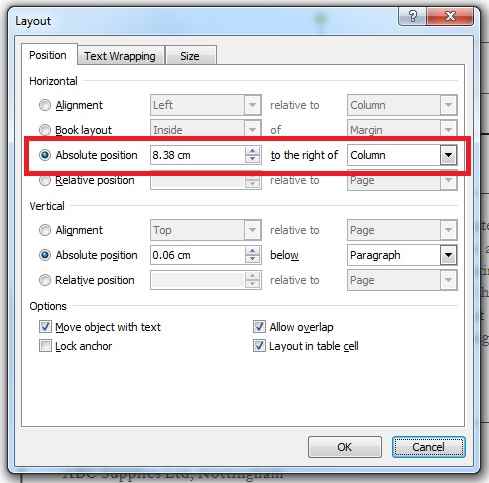
And finally on the Achiever CV template, this is the setting for lining up the headings, lines and text in the right column:
15. How to save and print your CV (for best quality)
Quite a few of our CV templates have images in them – but unfortunately Microsoft Word doesn’t always handle images well. There are two steps to take if your CV template doesn’t look perfect when you print it or save it as a PDF.
- Go to FILE > OPTIONS > ADVANCED and underneath ‘IMAGE SIZE AND QUALITY’ select ‘DO NOT COMPRESS IMAGES IN FILE’.
- Save the template from Adobe Acrobat as a PDF, or whilst in Word, choose PRINT and then choose ‘PDF’ as the printer.
Please note that with regret, due to the large number of people downloading our templates and the fact that our service is free, we are unable to provide individual support on editing the templates. We will however do our best to update this article with guides on making common adjustments so do comment below if you are having an issue!
aoa sir
sir plz send me a CV format in ms word
where is the download link to simply download the cv?! thanks for all the help but i cant find the initial first step
Hi Emma, where it says Price: Free Download, please try clicking the ‘Free Download’ link 🙂
But Where is Link
The download link for each CV template is on the individual CV template’s page – where it says “Price: Free Download”.
There is no link to download CV
Hi Faith – where it says ‘Price: free download’ please click the “Free download” bit 🙂
Can only download in PDF and cannot edit from there? how do I get a Word document?
Hi Peggy – on the page for the CV that you like, where it says ‘Price: Free Download’, please click the ‘Free Download’ bit. 🙂